There is no single best build for every Sephiria run. Start with Frozen Smelt for low-input freeze control, Guardian Greatsword for a forgiving defensive route, Formless Dance for ranged evasion, Minigun for sustained ranged damage, or Infinite Elemental Bolt for a caster route. If you specifically want automatic Planet damage, use the Planet retest blueprint below instead of treating an old recipe as a current clear.
Every setup keeps the version and evidence its source can prove. A video clear proves the shown run; a community clear claim is not a replay by this site; a legacy blueprint must be retested after relevant balance changes.
Video ClearThe build overview and a boss or clear appear in the linked run.
Community Clear ClaimAn exact recipe and stated clear exist; this site has not replayed it.
Current TestCurrent-patch footage exists, but the setup is not yet a Best Pick.
Legacy / RetestThe route predates 1.0 or a relevant balance change and needs retesting.
Find the Right Sephiria Build
Choose a playstyle first, then narrow by weapon. Evidence and recorded version stay visible on every result. The filters change only these summary cards; every complete setup remains available below.
Showing all 7 routes: 6 featured builds and 1 Planet retest blueprint.
01 · Low-input controlCommunity Clear Claim
Frozen Smelt
Freeze normal enemies quickly and recover through mistakes.
Best for
Low-input freeze control; Hard 60 community claim
Weapon path
Dagger → Sleeping Frost → Frozen Smelt
Must-have
Ice Snow · Ice Seagull · Frozen Egg
Version
Recorded on 1.0.24 · retest on 1.0.25
Preset
No public preset
Open full setup →02 · Ranged evasionVideo Clear variant + Community Clear Claim
Formless Dance
Keep range, attack speed and evasion working together.
Best for
Ranged safety; community recipe plus video-preset variant
No summary card matches every filter. Reset the filters or browse the complete setups below.
High-demand guide · evidence-limited
Sephiria Planet Build: Legacy Blueprint and 1.0 Retest
Legacy recipeCurrent mechanics checkedNo complete 1.0 clear foundNo public preset found
Direct Answer
The safest Sephiria Planet Build answer is a retest blueprint, not a current meta claim. Complete public recipes were found for 0.10.8, 0.10.13 and 0.901.3 beta. The v1.0.24 community database still lists the Planet Combo, Astronomer and the core Planet Artifacts, but the reviewed sources did not contain a complete 1.0 preset and matching clear. Start from the recurring Planet + Wind Song shell, test Astronomer first, and keep the recorded-version warning attached to the route.
What You Can Safely Use as a Starting Point
Planet 10 is the highest currently listed threshold.
Survival 20 / Will 20 appears in the coherent 0.10.8 recipe and the later 0.901.3-beta skeleton.
Planet 2 / Wind Song 2 / Mystic 1 / Adaptive appears on the Fruit Skewer in those same two sources.
Ashen, Yellow, Red, Blue, Sky-blue and White Planets form the recurring core; add Black Planet when available.
Giant Telescope and Sheet Music 'Galaxy' are the recurring cycle pieces.
Astronomer is the first Miracle to retest because its listed bonuses directly support Planet damage and attack speed.
What Is Not Verified for 1.0
No complete same-run 1.0 Planet setup and clear was found.
No public preset code was present in the four reviewed recipe sources.
No current best Costume or weapon has been verified.
Old difficulty and DPS claims cannot be carried into 1.0 without a retest.
The repeated Giant Telescope layout in one 0.10.13 editor source is not a current requirement.
Current Planet Combo Effects
Planet thresholds listed by the Sephiria community database for v1.0.24
Planet count
Listed effect
2
+8% Planet damage
4
+10% Planet damage
6
+12% Planet damage
8
+14% Planet damage
10
+16% Planet damage and +12% Planet attack speed
These are the threshold lines as listed by the v1.0.24 community database. This page does not assume that separate threshold lines stack unless that behavior is verified in the current client.
Galaxy changed in 0.12.0; retest the current cycle.
Buff and Bridge
Add direct Planet support only when the core still fits.
Astronomer
Red Planet Observation Log
Wind Song
Crystal of Harmony
These pieces are source-dependent, not one mandatory package.
Planet Build Retest Blueprint
Start from the recurring shell.Test Survival 20 / Will 20 with Planet 2 / Wind Song 2 / Mystic 1 / Adaptive on the Fruit Skewer. This pattern comes from 0.10.8 and 0.901.3 beta, not from a verified 1.0 clear.
Use the documented crossbow route for the first comparison.The clearest old recipe used Fairy of Fortune and Heavy Crossbow: Acceleration Core. Record the current attack pattern instead of assuming the old result still holds.
Test Astronomer before the old Gambler route.Astronomer has direct listed Planet bonuses. Gambler belongs to the 0.10.8 Luck-focused recipe and remains a comparison route.
Build the Planet threshold.Prioritize Ashen, Yellow, Red, Blue, Sky-blue and White Planets; add Black Planet when available. Do not sacrifice a working run simply to force every color.
Complete the cycle engine.Giant Telescope and Sheet Music 'Galaxy' are the recurring pieces. Galaxy changed in 0.12.0, so record its current cycle behavior.
Add bridges only when the inventory supports them.Red Planet Observation Log can connect Planet and Ember. Wind Song pieces and Crystal of Harmony appear in old recipes, but they should not crowd out the Planet threshold.
Validate the whole run.Capture the game version, difficulty, Talents, final inventory, active Combo thresholds, weapon route and result in the same run before promoting the build.
Artifact Priorities for the Retest
Planet Artifact priorities for a current retest
Priority
Artifacts
Instruction
Planet core
Ashen, Yellow, Red, Blue, Sky-blue and White Planets; Black Planet when available
Raise the Planet threshold. The exact mix remains run-dependent.
Cycle engine
Giant Telescope; Sheet Music 'Galaxy'
Test current placement and attack-cycle behavior. Do not copy an old multi-Telescope editor layout as a requirement.
Optional bridges
Red Planet Observation Log; Wind Song pieces; Crystal of Harmony
Add only when they improve the current inventory without breaking the Planet core.
Staff source key; English localization not verified
Astronomer
Survival 20 / Will 20
The closest pre-1.0 skeleton, but it has no explanation, preset or clear.
One 0.10.13 editor source contradicts itself about the Talent total and repeats Giant Telescope in its saved layout. This page uses it only for route comparison and does not publish those conflicting details as current instructions.
Relevant Official Change Timeline
Official changes that affect how legacy Planet routes should be interpreted
These videos help explain older Planet routes, but they do not prove a current 1.0 setup. The creators prohibit re-uploading, so this page links to the original videos instead of copying clips, frames or thumbnails.
No public preset code was present in the four reviewed Planet recipe sources. A code will be added only after its version and complete setup can be verified.
Have a Current Planet Clear?
Help turn this retest blueprint into a verified guide. Send the game version, difficulty, preset code if available, Talent screen, final inventory, active Combo thresholds and a full-run or boss video link. Please also confirm that the guide may cite and link your submission.
Open one setup at a time. Each recipe keeps its Costume, weapon path, Talents, Miracle, Combo engine, Artifact priorities, failure conditions, recorded version and original source together.
01Frozen SmeltFreeze normal enemies quickly and recover through mistakes.Dagger → Sleeping Frost → Frozen SmeltCommunity Clear ClaimRecorded on 1.0.24 · retest on 1.0.25
A freeze-and-lifesteal route for players who want a forgiving late game and a simple secondary-attack loop.
Community Clear Claim · Hard 60 source · Low input · Recorded on 1.0.24 · Needs 1.0.25 retest
Build snapshot. Weapon path: Dagger → Sleeping Frost → Frozen Smelt · Costume: Wings-lost Bat · Talents: Base 5 · Will 20 · Anger 20 · Wisdom 5 · Miracle: Hunter · Main Combos: Glacier · Precision · Fruit Skewer: Adaptive Drop Bonus 1 · Glacier 3 · Precision 2 · Wishing Well: Amulet of Aspiration · Blue Claws · Recorded version: 1.0.24 · Evidence: Exact community recipe + author Hard 60 claim; no same-run video attached
Best forPlayers who prefer control and sustain over a high-input damage rotation.
Avoid ifYou do not have the Wings-lost Bat costume, or you want a build with same-run video proof.
How it works
After the second weapon upgrade, the secondary attack can trigger Freeze quickly enough to stop many normal enemies before they reach you. Wings-lost Bat supplies lifesteal for mistakes, while Glacier provides control and Precision raises late-run damage. The source author reports roughly 10K baseline late-run DPS and up to about 17K with Berut’s Sickle. Those numbers are source-reported results, not measurements made by this site.
Artifact priority
Artifact priorities for Hard 60 Frozen Smelt - Right-Click Control
Priority
Artifacts
Instruction
Start
Amulet of Aspiration · Blue Claws
Take both from the Wishing Well preset.
Required Glacier core
Ice Snow · Ice Seagull · Frozen Egg
The source explicitly marks these three as required.
Additional Glacier
Libra · Amulet
Use them to finish or strengthen the Glacier package.
Precision damage
Berut’s Sickle · Walter’s Work Monocle · Pointed Bat · Warm Stone · Sword Earring · Green Tooth · Black Scales
Prefer Crit Chance and Crit Damage that fit without breaking the core.
Precision survival
Library Miniature · Swaying Eyes
Library Miniature is specifically recommended for survivability.
Add only after the freeze and Precision packages are stable.
Build order
Start with Amulet of Aspiration and Blue Claws.
Follow Dagger → Sleeping Frost → Frozen Smelt.
Secure Ice Snow, Ice Seagull and Frozen Egg before chasing optional damage.
Add Precision items, prioritizing Crit Chance until hits are consistent, then Crit Damage.
Keep Wisdom 5 in the saved setup. If repeated secondary attacks still drain MP, take another MP source instead of forcing continuous fire.
Add Berut’s Sickle only as a high-value damage upgrade; the build should already function as a freeze-control route without the reported peak DPS.
How to play
Use the secondary attack to freeze packs before they enter melee range. Against bosses, keep the right-click loop active only while MP is stable and use Bat lifesteal to recover from small hits. This is a low-input route, not an excuse to ignore lethal patterns.
What can break the build
The route loses its identity when Ice Snow, Ice Seagull or Frozen Egg do not appear. Continuous secondary attacks can also exhaust MP. If two required Glacier pieces are still missing after the weapon reaches Sleeping Frost, stop spending upgrades on optional Precision pieces and preserve a pivot into a generic Dagger/Precision route.
Source recipe: ch1, “Hard 60 Frozen Smelt - Right-Click Only,” recorded on 1.0.24. Community data checked August 8, 2026. Open original source
Did this build work on your patch?
02Formless DanceKeep range, attack speed and evasion working together.Staff → Throwing Spear → Formless DanceVideo Clear variant + Community Clear Claim1.0.24 recipe / 1.0-era video
The community recipe and the video preset share the same final weapon and several core ideas, but they use different costumes and setup details. Choose one variant before the run; do not mix their labels into a single “verified” build.
Deer video preset
A Deer preset with public build overview, final inventory and boss footage for the shown run.
Video Clear · 1.0-era · exact patch not stated · Preset available
Build snapshot. Weapon path: Staff → Throwing Spear → Formless Dance · Costume: Deer · Core items: Mysterious Weight · Wings · Six-leaf Clover · Main Combos: Firmness · Shadow · Spring Song · Miracle: Duelist · Video date: August 4, 2026 · Exact patch: Not stated by the creator
Best forPlayers who want an importable Formless Dance setup tied to public footage.
Avoid ifYou want to use the Red Fox Talent and Wishing Well choices above; they do not belong to this run.
How it works
This video uses the Deer variant, not the Red Fox recipe above. Use the preset and footage together; do not attribute the Red Fox Talent or Wishing Well choices to this run.
Artifact priority
Artifact priorities for Variant B - Deer Video Preset
Priority
Artifacts
Instruction
Core shown by creator
Mysterious Weight · Wings · Six-leaf Clover
Import the preset and use the Build Overview for the complete setup instead of guessing missing text.
Build order
Import the single-line Deer preset before the run.
Follow Staff → Throwing Spear → Formless Dance.
Use the 00:00 Build Overview and 16:37 final specs together when comparing the run.
How to play
Stay at range, use evasion as a safety layer, and keep attack uptime through the boss patterns shown in the linked run.
What can break the build
The creator did not state the exact patch. Treat the video as proof for the shown run, not a silent 1.0.25 compatibility claim.
Video source: ONEMORE, published August 4, 2026. Exact patch not stated by the creator. Open original source
Red Fox community recipe
A ranged Javelin route that combines evasion, attack speed and Bloodstone lifesteal for a safer Hard 60 attempt.
Community Clear Claim · Hard 60 source · Recorded on 1.0.24 · Needs 1.0.25 retest
Build snapshot. Weapon path: Staff → Throwing Spear → Formless Dance · Costume: Red Fox · Talents: Base 10 · Will 20 · Anger 10; put spare points into Rapid · Miracle: Duelist · Main Combos: Spring Song · Shadow · Supporting package: Firmness through Fruit Skewer and Artifact choices · Fruit Skewer: Shadow 2 · Spring Song 2 · Firmness 2 · Wishing Well: Bloodstone Earrings · Talisman of Talent · Recorded version: 1.0.24
Best forRanged players who want evasion and frequent-hit sustain with an exact community recipe.
Avoid ifYou cannot begin with Bloodstone Earrings, or you want same-run video proof for this exact Red Fox setup.
How it works
Throw from range, stack attack speed and evasion, and let Bloodstone Earrings turn frequent hits into sustain. The source aims for about 100 displayed Evasion and reports that the observed dodge rate stopped improving at roughly 76%. Precision is a supporting damage package rather than one of the two saved Combo fields.
Artifact priority
Artifact priorities for Variant A - Red Fox Evasion Recipe
Priority
Artifacts
Instruction
Required start
Bloodstone Earrings · Talisman of Talent
Red Fox has no built-in recovery; the author treats Bloodstone Earrings as essential.
Shadow core
Six-leaf Clover
Treat as near-required.
Shadow support
Broken Sapphire · Model Beak · Green Clothes · Elastic Band · Cloak of the Green · Vane · Talisman of Talent
Build toward high Evasion without blocking attack-speed pieces.
Prioritize Attack Speed for both DPS and Bloodstone healing frequency.
Firmness
Mysterious Weight · Agma Projection Sword · Crown of Humility · Mark of Warrior · Glass Hammer · Viscosity · Begonia Flavor Pocket
Mysterious Weight is the biggest direct power increase in this group.
Precision/Flex
Walter’s Work Monocle · Black Scales · Defect Probe · Warm Stone · Sword Earring · Amulet of Aspiration · Unclean Bandage
Aim for approximately 60% Crit Chance and 100% Crit Damage.
Build order
Lock in Bloodstone Earrings before starting the Red Fox version.
Follow Staff → Throwing Spear → Formless Dance.
Secure Six-leaf Clover, then build Spring Song attack speed.
Add Firmness without sacrificing the evasion and attack-speed core.
Use Precision pieces to approach about 60% Crit Chance and 100% Crit Damage.
If spare Talent points remain, add Rapid.
How to play
Stay at Javelin range, keep attacking to maintain Bloodstone recovery, and use high Evasion as a safety layer rather than a substitute for movement. Against bosses that punish melee trades, keep the fight at range and let attack speed carry both damage and sustain.
What can break the build
Do not recommend the Red Fox version without Bloodstone Earrings. If Six-leaf Clover does not appear, two or three Talisman of Talent copies can keep the Evasion plan alive, but the ceiling is lower. If both recovery and Evasion fail to assemble, pivot to a generic ranged Firmness/Precision route instead of continuing to force Shadow.
Source recipe recorded on 1.0.24. Community data checked August 8, 2026. Open original source
Did this build work on your patch?
03MinigunAn importable ranged route with recorded Hard 35 footage.Heavy Crossbow → Unstable Lightning Mark → MinigunVideo Clear1.0 launch-era · exact patch not stated
The White Rabbit preset has a recorded Hard 35 run. The Scholar Lizard version is a popular 1.0.23 tank recipe with a different start and no attached clear video. Keep them separate.
White Rabbit video preset
A sustained ranged build with a full route, importable preset and recorded Hard 35 boss footage.
Video Clear · Hard 35 · 1.0 launch-era · exact patch not stated · Preset available
Build snapshot. Weapon path: Heavy Crossbow → Heavy Crossbow: Unstable Lightning Mark → Minigun · Costume: White Rabbit · Core items: Blue Wrist Guard · Brass Mirror Fragment · Walter’s Work Monocle · Main Combos: Firmness · Precision · Magitech · Recommended Miracles: Hunter · Assassin · Lightning-specialist Miracle (source label: 전격술사) · Recorded target: Hard 35 · Exact patch: Not stated by the creator
Best forPlayers who want sustained ranged fire with an importable code and public boss footage.
Avoid ifYou need a setup independently retested after the 1.0.23 Minigun MP changes.
How it works
The route sustains ranged fire through a preset whose Build Overview and final boss are visible in the linked run. The source label 전격술사 has not been confirmed against an English client, so this page does not invent a unique English proper name for it.
Artifact priority
Artifact priorities for Variant A - White Rabbit Hard 35 Video
Priority
Artifacts
Instruction
Core shown by creator
Blue Wrist Guard · Brass Mirror Fragment · Walter’s Work Monocle
Use the preset and Build Overview together for the complete setup.
Build order
Import the single-line White Rabbit preset.
Follow Heavy Crossbow → Heavy Crossbow: Unstable Lightning Mark → Minigun.
Review the 00:00 Build Overview before comparing the 16:46 final boss footage.
How to play
Hold sustained fire while MP remains stable, but keep enough movement to respect major boss patterns.
What can break the build
The video predates or does not state compatibility with later MP fixes. Do not infer infinite MP from the shown route.
Video source: ONEMORE, published August 1, 2026. Exact patch not stated by the creator. Open original source
Scholar Lizard tank recipe
A hold-to-fire Minigun route that trades peak damage for Guardian shields and safer sustained pressure.
Community Favorite · 45 community likes · Recorded on 1.0.23 · Needs 1.0.25 retest
Build snapshot. Weapon path: Heavy Crossbow → Heavy Crossbow: Unstable Lightning Mark → Minigun · Costume: Scholar Lizard · Saved Talents: Will 20 · Anger 20 · Patience 10 · Miracle: Electromancer; use Valet as the safer alternative · Main Combos: Guardian · Magic Engineering · Fruit Skewer: Adaptive Drop Bonus 1 · Guardian 3 · Magic Engineering 2 · Wishing Well: Cloth Armor · White Bread; Heart of the Beast is an alternative · Recorded version: 1.0.23
Best forPlayers who prefer a tankier sustained-fire shell and can build Guardian before flex damage.
Avoid ifYou expect infinite MP, invulnerability, or same-run clear footage.
How it works
Hold the secondary attack for sustained fire, but continue to dodge major patterns. Seren’s shield takes roughly four seconds to form on Minigun in the source author’s testing, so the build is tankier, not invulnerable. The author reports about 4K-5K DPS after stacking Lightning Amulets; treat this as a source claim.
Artifact priority
Artifact priorities for Variant B - Scholar Lizard Static Tank
Priority
Artifacts
Instruction
Guardian
Heart of the Beast · White Bread · Shield Bag · Seren’s Wanging Letter · Cloth Armor · Broken Mirror · Hand Mirror · Shield · Lizard Sheet
Reach Guardian 10 and prefer items that create or strengthen shields.
Build toward 10; replace filler with stronger keys or amulets as they appear.
Precision/Flex
Walter’s Work Monocle · Berut’s Sickle · Black Scales · Defect Probe · Pointed Bat · Warm Stone · Sword Earring · Sharp Eye · Red Dew · Kaleidoscope · Green Tooth · Amulet of Aspiration · Unclean Bandage
Fill remaining slots with efficient Crit and Crit Damage pieces.
Other useful items
Ice Snow · Blue Wrist Guard · Multi-use Belt · Black Tea · Shock Amplifier · Stone Wheel · Brass Mirror Fragments
Add only after Guardian and Magitech are functioning.
Build order
Start from the saved Will 20 / Anger 20 / Patience 10 allocation.
Follow Heavy Crossbow → Heavy Crossbow: Unstable Lightning Mark → Minigun.
Reach Guardian 10 and make its shield engine functional.
Build Magic Engineering toward 10 before filling remaining slots with Precision pieces.
Add MP regeneration or MP absorption if sustained fire is not stable after the Brass Mirror fix.
How to play
Hold the secondary attack for sustained fire, but continue to dodge major patterns. Seren’s shield takes roughly four seconds to form on Minigun in the source author’s testing, so the build is tankier, not invulnerable.
What can break the build
If Guardian and Magitech work but sustained fire still lacks MP support, add regeneration or absorption instead of forcing the old bugged interaction. Pivot to a burst-oriented Crossbow route if sustained fire cannot be supported.
Community recipe recorded on 1.0.23 with 45 community likes. Community data checked August 8, 2026. Open original source
Did this build work on your patch?
04Guardian GreatswordA forgiving shield-and-lifesteal route with low legendary dependence.Steel Greatsword → Bone Mechanism Sword → Creaking SpineCommunity FavoriteRecorded on 1.0.23 · retest on 1.0.25
A forgiving defense-and-lifesteal route for players who value consistency more than burst damage.
Community Favorite · 58 community likes · Hard 38 source · Recorded on 1.0.23 · Needs 1.0.25 retest
Build snapshot. Weapon path: Steel Greatsword → Bone Mechanism Sword → Creaking Spine · Costume: Rabbit · Talents: Will 20 · Patience 20 · Miracle: Valet · Main Combos: Guardian · Spring Song · Fruit Skewer: Guardian 3 · Spring Song 3 · Wishing Well: Bloodstone Earrings · Cloth Armor · Recorded version: 1.0.23 · Community evidence: 58 likes; title targets Hard 38; author also reports a first Hard 30 final-boss clear
Best forFirst Hard Mode progression, players learning boss patterns, and low-legendary runs.
Avoid ifYou want fast boss kills or a same-run video with an importable preset.
How it works
Guardian supplies the defense needed to trade safely, Spring Song adds attack speed and movement value, and Bloodstone Earrings convert repeated hits into recovery. Rock Elephant is the author’s most important damage piece. The result is stable at low investment, but it will feel slower than high-roll crit or elemental builds.
Artifact priority
Artifact priorities for Guardian Greatsword - Beginner-Friendly Hard Clear
Priority
Artifacts
Instruction
Start
Bloodstone Earrings · Cloth Armor
Upgrade Bloodstone Earrings toward +3 early to reduce its defense penalty.
Guardian core
Rock Elephant · Heart of the Beast · Hand Mirror · Lizard Sheet
Reach Guardian 10; prioritize Rock Elephant for missing damage.
Spring Song
Wings · Wanderer’s Necklace · Colorless Cube · Pallas Card · Flag of Encouragement · Swordsmanship Textbook
Reach Spring Song 10 with Attack Speed pieces first.
Utility
Pot Lid · Pure Cloak · Sheet Music: Breeze
Pot Lid helps MP, Pure Cloak extends the short self-buff, and Breeze improves room clear.
After the core
Mystery 2 · efficient Firmness items
Do not delay Guardian 10 or Spring Song 10 for these.
Build order
Start with Bloodstone Earrings and Cloth Armor.
Upgrade Bloodstone Earrings early so its defense penalty does not undermine Guardian.
Follow Steel Greatsword → Bone Mechanism Sword → Creaking Spine.
Reach Guardian 10 and Spring Song 10 before adding side packages.
Search for Rock Elephant to solve the build’s low damage.
Add Pot Lid or Pure Cloak if the Creaking Spine self-buff feels too short or too expensive.
Once sustain is stable, sell unused potions for target shop items only when doing so does not risk the current floor.
How to play
Use defense and lifesteal to survive ordinary trades, but still respect large boss attacks. Keep the Creaking Spine buff active when MP allows it, and use Spring Song attack speed to improve both damage and Bloodstone recovery.
What can break the build
The route remains playable without most legendary Artifacts, but it becomes painfully slow without Rock Elephant or another reliable damage source. If Guardian is assembling but Spring Song is not, preserve defense and pivot the open slots into efficient Firmness damage rather than forcing weak attack-speed pieces.
Community recipe recorded on 1.0.23 with 58 community likes. Community data checked August 8, 2026. Open original source
Did this build work on your patch?
05Infinite Elemental BoltBuild one working elemental engine before attempting the full fusion route.Staff → Flame Staff → Elemental Fusion Staff IlonicaCommunity Clear ClaimRecorded on 1.0.24 · Floor 50 source claim
A homing three-element caster route that becomes comfortable once the Bolt and Academy cores are assembled.
Community Clear Claim · Floor 50 source · Caster · Recorded on 1.0.24 · Needs 1.0.25 retest
Build snapshot. Weapon path: Staff → Flame Staff → Elemental Fusion Staff Ilonica · Costume: Ghost · Talents: Base 20 · Will 20 · Anger 10; priority Will → Base → Anger · Miracle: Elementalist · Main Combos: Academy · Element · Fruit Skewer: Academy 3 · Ember 1 · Glacier 1 · Magic Engineering 1 · Recorded version: 1.0.24 · Evidence: Exact community recipe + Floor 50 claim; no preset or attached clear video
Best forPlayers who want a Staff build with homing projectiles and multi-element scaling.
Avoid ifYou dislike attack recoil, tight inventory planning or a core-heavy opening.
How it works
Choose one starting package. During the run, try to collect the missing Bolt and caster pieces; the author treats the complete group as the highest upgrade priority. The build uses homing projectiles and multi-element scaling, but its inventory pressure makes disciplined choices essential.
Artifact priority
Artifact priorities for Floor 50 Infinite Elemental Bolt
Priority
Artifacts
Instruction
Start A - Triple Bolt
Lightning Bolt · Ice Bolt · Fire Bolt
Choose this package or Start B, not all five items at once.
Start B - Caster Core
Rat Wizard’s Pendant · Bishopric Crown
Choose this package or Start A, then collect missing core pieces during the run.
Academy
Wizard · Craving · Agbae Tree Fruit · Pearl Powder · Jewelry Armor · Academy Brigandine · Combat Wizard Gloves · Meditation Books · Riley Congregation Clock · Empty Handle · Shield Bag
Upgrade Spellbook Damage and Crit first. Late-game Spellbook Haste is usually sufficient.
Multi-element
Libra · Sealed Tejas · Plasma Helmet
Prioritize useful dual-element items while building Ember, Glacier and Magitech to roughly 4-6 each.
Complete the Bolt and Academy core before chasing side synergies.
Build Ember, Glacier and Magic Engineering to about 4-6 each through efficient dual-element items.
Keep only one or two defensive pieces; reserve inventory space for the caster engine.
How to play
Use homing Bolts to clear normal rooms and maintain damage on moving bosses. The weapon pushes the character backward while attacking, so leave room behind you and correct your position before the recoil carries you into hazards.
What can break the build
The build is comfortable once its core appears but is inventory-hungry. If neither the three Bolts nor the caster-core start develops by the first major upgrade, stop collecting weak pieces from all three elements. Pivot into the strongest single-element Staff package already in the bag.
Community recipe recorded on 1.0.24 with a Floor 50 claim. Community data checked August 8, 2026. Open original source
Did this build work on your patch?
06Biryuu KatanaScale wide normal attacks and final-hit critical damage.Katana → Sword-Arc Blade: Cheongwangsak → Sword-Arc Blade: BiryuCommunity RecipeRecorded on 1.0.24
A wide-area Katana route that treats Biryuu attacks as normal and final hits, then scales Firmness, Crit and Execute effects.
Community Recipe · Recorded on 1.0.24 · Author tested at Hard 60 · Needs 1.0.25 retest
Build snapshot. Weapon path: Katana → Sword-Arc Blade: Cheongwangsak → Sword-Arc Blade: Biryu · Costume: Red Fox · Talents: Base 10 · Will 20 · Anger 20; unlock Will 20 → Base 10 → Anger 20 · Miracle: Hunter · Main Combos: Firmness · Precision · Fruit Skewer: Adaptive Drop Bonus 1 · Precision 2 · Firmness 3 · Wishing Well: Crown of Humility · Criton · Recorded version: 1.0.24
Best forPlayers who want large-area normal attacks, Katana Block and late-run crit scaling.
Avoid ifYou want attached independent clear footage or guaranteed high Execute rolls.
How it works
The author reports using the build at Hard 60, but the entry does not attach independent clear footage. Biryuu attacks count as both normal attacks and final hits in the source recipe, which lets Firmness and Precision support the same attack loop.
Artifact priority
Artifact priorities for Biryuu Katana - Guaranteed-Crit Final Hits
Priority
Artifacts
Instruction
Firmness
Mysterious Weight · Agma Projection Sword · Rabbit Village Guard Helm · Glass Hammer · Viscosity · Amulet of Power · Mark of Warrior · Silver Plate · Begonia Flavor Pocket
Firmness is a real core, not a filler package.
Optional Firmness
Eternal Winter
Optional only; do not apply old pre-1.0 values.
Precision core
Pride · Berut’s Sickle
The author treats Pride as essential and Berut’s Sickle as the second priority.
Precision support
Walter’s Work Monocle · Black Scales · Pointed Bat · Warm Stone · Sword Earring · Defect Probe · Sharp Eye · Green Tooth
Add Crit Chance, Crit Damage and Execute without breaking Firmness.
Survival
Swaying Eyes · Broken Sapphire · Cloak of the Green · Hand Mirror · Broken Mirror · Dash-count items
Take what the run needs after the damage engine is working.
Flex
Lucky Medal · Criton · Black Tea · Cold Lock · White Paper · Bloodstone Earrings · Angry Potato
Optional economy, sustain and armor-penetration value.
Build Firmness and Precision together; do not dilute the run with unrelated sets.
Secure Pride before treating the final-hit crit interaction as complete.
Add Berut’s Sickle and other Execute/Crit pieces only after the guaranteed-crit engine is active.
How to play
Before the first Anvil upgrade, use Katana Strong Slash normally. After the upgrade, hold normal attack and tap secondary attack to repeat the large-area strike. Biryuu attacks count as both normal attacks and final hits in the source recipe. Katana Block remains important for boss patterns and unsafe trades.
What can break the build
At 4/4, Pride is reported to make the final hit critically strike. High Execute values are a late-run ceiling, not a guaranteed result. Without Pride, continue as a standard Firmness/Precision Katana and stop chasing final-hit Execute pieces.
Community recipe recorded on 1.0.24. Community data checked August 8, 2026. Open original source
Did this build work on your patch?
Sephiria Preset Codes and Clear Evidence
Copy only the code attached to the named variant. A preset does not prove a current clear by itself, so use the recorded-version badge and linked footage together.
Looking for a Planet code? None was published in the four reviewed Planet recipe sources.
The creator provides a preset and a visual Build Overview, but not a complete written item list. Import the code and watch the overview rather than relying on guessed text.
The creator provides a preset and a visual Build Overview, but not a complete written item list. Import the code and watch the overview rather than relying on guessed text.
The creator provides a preset and a visual Build Overview, but not a complete written item list. Import the code and watch the overview rather than relying on guessed text.
Protect the engine that already works. Do not fill the inventory with weak pieces from several unfinished Combos just because the planned legendary item did not appear.
Run rescue decisions for the seven routes
Build
Protect first
If missing
Pivot
Frozen Smelt
Glacier core
Required freeze pieces
Generic Glacier/Precision
Formless Dance
Recovery + attack speed
Six-leaf Clover or recovery
Ranged Firmness/Precision
Minigun
Stable MP + working weapon
Infinite-MP assumption fails
Burst Crossbow
Guardian Greatsword
Guardian threshold
Shield engine incomplete
Defensive Greatsword
Elemental Bolt
One strong element
Cannot support three elements
Single-element caster
Biryuu Katana
Normal-attack/crit core
Guaranteed-crit chain fails
Standard Katana crit
Planet
Planet threshold + cycle engine
Telescope/Galaxy route incomplete
Do not force Planet 10; pivot to working attack-speed route
Current Tests, Failed Ideas and Co-op Evidence
These sources are useful research, but they do not meet the same promotion threshold as the six featured builds. A failed test remains visible when it explains what not to copy.
Promising current tests
Cloud Collector
Current Test · 1.0.25
The test uses Wisdom 20 and Base 10 to generate more choices and compress the inventory through the Wisdom 10 effect. Ruby Brooch plus Ember and Magitech are used to maintain high Plasma stacks, while the Alchemy start snowballs elemental damage. Angry Potato contributes both early build value and late armor penetration. The creator notes that Tablet upgrades must be adjusted around the Wisdom 10 effect and suggests Deer with Compass and Magma Orb as a possible alternative start.
The run did not complete the intended Precision 10 package because the required drops did not appear. The creator notes that Lightning makes Crit easier to build and suggests Berut’s Sickle as a possible ceiling piece. Treat this as a current-patch test, not a finished recipe.
Use this as a progression example, not a copyable full recipe. The creator did not publish a complete written Costume, Talent, Wishing Well and Artifact list or a preset code.
The test increased attack speed, reload speed and magazine size to trigger Solar Sword through normal attacks. In practice, Solar Sword did not activate on every normal attack, suggesting an internal cooldown or another restriction. The creator concludes that the build needs revision. Keep this visible as useful negative evidence rather than presenting every test as a success.
The route maximizes Special Attack range until normal enemies can be cleared across most of the screen. The author reports 4,384 inner-area DPS and 6,577 outer-area DPS, rising to 7,416 and 11,124 with Execute. The test conditions are not documented, the opening can be weak, and the build is fragile, so these figures stay source-reported.
Fight in melee with Dagger attacks when it is safe, or kite while Storm Cloud deals damage against dangerous bosses. The creator reports about 30K normal-attack DPS only after Storm Cloud 10, Precision 10, Magic Engineering 8, useful Bond items and some Element support. That is a high-roll ceiling, not the expected floor.
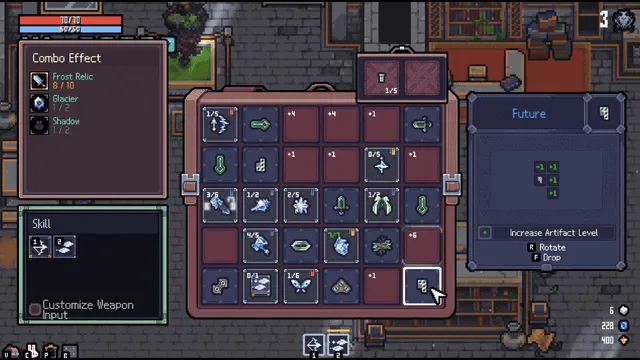
A weapon name is not a complete build. Read the setup in this order so you know what the route needs, what can change during the run, and what the source actually proves.
Illustrative inventory arrangement from the build-system demonstration. Use it to understand the interface; it is not a recommended final build.
Weapon path. Confirm the base weapon and both upgrade decisions.
Core engine. Identify the Costume, Talents, Miracle, Fruit Skewer and Wishing Well choices that make the route function.
Inventory and Combos. Secure required Artifacts first, then add support and flex pieces without breaking active thresholds.
Evidence and version. A clear on an older patch proves that run, not automatic compatibility with the current patch.
How a Build Becomes a Featured Pick
An exact setup or importable preset exists.
The recorded version is named or the missing patch is disclosed.
A recipe, video or clear claim is described without upgrading its evidence.
Relevant later patch changes are checked before the route is promoted.
Sephiria Builds FAQ
What is the best build in Sephiria 1.0?
There is no universal winner. Frozen Smelt is the clearest low-input control route in this source set, Guardian Greatsword is the most forgiving beginner option, Formless Dance combines range and evasion, Minigun has an importable Hard 35 video route, and Infinite Elemental Bolt is the main caster option. Choose by goal and check the recorded-version badge.
What is the easiest Sephiria build for a beginner?
Start with Guardian Greatsword if you want defense, lifesteal and low legendary dependence. Frozen Smelt is another simple route once Wings-lost Bat and the required Glacier pieces are available. Both older recipes still need a current-patch retest.
Is there a current Sephiria Planet Build?
The page provides a Planet retest blueprint, not a verified current meta build. The recurring Planet and Wind Song shell, current listed Combo effects and relevant Artifacts were checked, but no complete same-run 1.0 Planet preset and clear was found in the reviewed sources.
What is the best weapon for a Planet Build?
Heavy Crossbow: Acceleration Core is the best-documented old route, but older sources also used Muramasa and a staff route. That history does not prove Crossbow is the current best weapon, so the page treats it as the first comparison route rather than a verified winner.
Does the Planet Build have a preset code?
No public Planet preset code was present in the four reviewed recipe sources. The page will add one only after the code, version and complete setup can be verified together.
Which builds have a recorded clear video?
The White Rabbit Minigun video shows a Hard 35 run and final boss. The Formless Dance video shows its Build Overview, final items and final boss, but the creator did not state an exact patch number. Community recipes for Frozen Smelt and Red Fox Formless Dance state Hard 60 clears without attaching same-run video to the database entry.
How do I import a Sephiria preset code?
Copy the complete code beginning with AAF_PRESET_OBFZ| and paste it into Sephiria’s preset import field. If the code is rejected, remove spaces or line breaks and confirm that the save has the required unlocks. Every value in the Preset Vault is stored and copied as one line.
What should I do if a core Artifact does not appear?
Protect the part of the build that already works and stop upgrading dead pieces. Preserve the working control, recovery, MP, shield or elemental engine, then pivot to the closest compatible route instead of forcing several incomplete Combos.
Are older 1.0 builds still usable on the latest patch?
They are useful starting points, not automatic current-patch proof. A later patch can change MP costs, weapon triggers, Combo thresholds or Artifact values. Every older recipe on this page keeps its recorded version and a retest warning.
Are solo and co-op builds the same?
No. Co-op changes the value of buffs, healing, revival and team uptime. The Healer Rabbit video proves solo viability for the shown co-op-oriented setup on 1.0.23; it does not prove current party balance.
Sources, Credits and Version Notes
Official patch notes define version changes. Community databases provide current listed values and written recipes. Creator videos provide proof only for the run they show. The visible review date changes only after those sources are checked again.